So unlike the majority of posts that I will hopefully put on here, this one will be a little more ‘build log’ orientated. That’s not to mean that by the end of reading you won’t have learned anything new. hopefully you will find it inciteful, and maybe even helpful for your own learning and exploration into the field of cloud native platforms. Believe me; The articles that sit on this blog are only where the work really begins. This is just as much the case for any public facing website or application that runs in the industry today. I think it’s all very exciting, and hopefully by the end of this article you will agree (at least partially).
Over the next ten or so minutes, I am going to take you on a journey of how this blog was born, and how it leverages the best of open-source and cloud native platforms to give it (I hope), a reliable and continuously developing design that all of you readers sitting at the other end can benefit from. I know what you are thinking; “What the Hell? Why would you use enterprise grade platforms, designed for large scale deployments, just to host your casual little web page?”. Well it wouldn’t really be a WTH blog post without having to stop and scratch your head at least once now would it? So, without further ado…
A Blog Site?
If you’re still wandering, no I am unfortunately not a professionally trained technology journalist for Wired or ArsTechnica. I am a young engineer, fresh out of University with a degree in Electronic and Computer Engineering. Over the past 10 years of my life, I have embarked on my own technological journey that has spanned from basic low level chip design (don’t ask me about VHDL, I don’t remember much), all the way up to configuring and debugging pre-release data-centre hardware at team blue. No spectre/meltdown wasn’t my fault, although it I definitely did choose an exciting time to be at the company.
I am now at the stage in my life where choosing the next step is both an exciting, yet cumbersome decision. But I have been fortunate enough to have taken a shining to the area of enterprise open-source software, which is what has led me here. As I am sure you will also understand, getting started with these platforms can be difficult. These platforms and tools are designed to be deployed on datacentre level hardware, at an industrial scale that few regular people will ever see, by large companies with a list of applications to run so long that it looks more like a £100 supermarket receipt. And so, this blog site seemed to be a no brainer; giving a means of noting down any learning performed over the next few months, with the added benefit of dragging along other casually interested folks on this journey with me!
Step 1. Architecting the site… from the ground to the ‘cloud’ 🌩
If any website or application is to be accessible over the internet, of course it must be hosted on a computer with a network connection somewhere in the world. While my own experience providing such services hasn’t been extensive, I had prior experience with services such as system/application monitors (NetData), application remotes, automation services and private cloud instances (NextCloud). These services all trundled along happily for a couple years, until the power supply on my home server decided to give up (RIP 💀), and I was left with nothing. Or so I thought…
I was pointed towards the Google Cloud Platform, which offers $300 in free credit to new users signing up. While that might not cut it for some of the big companies, as an individual just looking to learn, this is a gift. And so, when deciding to embark on this journey, Google Cloud seemed like the obvious place. Plans to build a M.O.A.W (mother of all workstations), weren’t going to materialise instantly, but by the time I was to run out of credit, I would hopefully be there with them.
Kuh-Kuh-Kuh-Kubernetes? Sorry I’m allergic to buzzwords.
As the deployment of this blog site was not just about what was on it, but also making the deployment experience sufficiently challenging and useful in my cloud native voyage, the obvious choice for a platform to use was Kubernetes. The technology is so hot right now that I almost feel bad for saying the word. However, after spending the last few months researching it, it seems obvious that it holds an incredible amount of power (hype jokes aside), while also offering well to me due to it being situated within the Linux world. The best part for me is that it is open-source, featuring many different weird and wonderful ways to deploy it (Kind, Minikube and Kubeadm just to name a few). Therefore, combined with Google’s very generous helping of $300 to spend in their Cloud Platform candy store, Google Kubernetes Engine was my poison of choice.

This is simply a cluster of VM instances with specifications that can be chosen by the user. I was going to tell you that each node was running a Debian based version of Linux, but lo and behold it’s Chrome OS 😲… at least they found a good use for it somehow! GKE makes the setup of a k8s cluster super easy, as you define it’s specifications and from their you’re faced with easy to use tools that allow you to interface with it and start configuring.
Hugo… the Web Framework, not the Super Villian 🦹🏼♂️
After choosing to follow down the route of GKE, I started following tutorials for running WordPress on GKE. Was there much thought put into this? Definitely not, but thankfully I was suggested by a friend to take a look at a static site framework called Hugo. This is a neat little tool written in Golang (hence the name), that takes content such as markdown text files, images, community made theme templates and config files, generating a full static site written in HTML and CSS. This means that I can concentrate a little more on the look, feel and content, while also getting to have a good level of customisation. This was a great choice, and I’m so far very happy with it. After a bit of reading to understand the directory structure required for the Hugo compiler to build my static site correctly, along with a fair few hours playing with some different theme templates and configs, the site was ready to go!
Step 2. Deployment
Giving Hugo a Home 🏠📦
So, as I just mentioned, the static site I was to find myself with would be made up of raw HTML and CSS files. So, if this was to be the case, I had to figure out a way I could bundle this all up into a workload that could act as an application on my freshly squeezed GKE cluster. There were two considerations to take here. First was that I would need some sort of web-server application, and second was the fact that it must be able to ‘speak Kubernetes’. By this I mean that it must be containerised in some way, so that Kubernetes can throw it into a pod when I create my deployment.
After jogging my memory and doing a little research, I decided on taking an Nginx docker image as a template and injecting my Hugo page into it. In order to make this magic happen, I used the docker command line interface’s ‘build’ command, along with a dockerfile (seen above). My blog now has a comfy little box to live in (a docker image) that I can throw on whichever platform I like, and it will always (more or less) run as expected. This is great for testing locally before deploying it into the big bad world 🌎.

Life is a journey… even for a container 🚀
So now I have a working image, crammed full of content intended for the lovely citizens of the internet to consume at their own free will; surely it is just a matter of uploading it to the GKE cluster and job done, right? Don’t worry, the fun isn’t over yet. In the image that was built above, it only contains the HTML and CSS of the site at that moment in time. When I deploy it on my cluster, sure it will work, but if I want to update the site, I’ll have to do the process all over again. That means another hugo build command, one more docker build, yet more pushing to some repository of images that my GKE cluster can access, then finally telling the cluster to kill all the pods in my deployment in order to create new ones with the latest image. Of course, I could have just made a little bash script to automate this process locally… but that felt like a shortcut in this case. I sought a method to approach this in a way that would teach me something new; the aim of the game for this project.
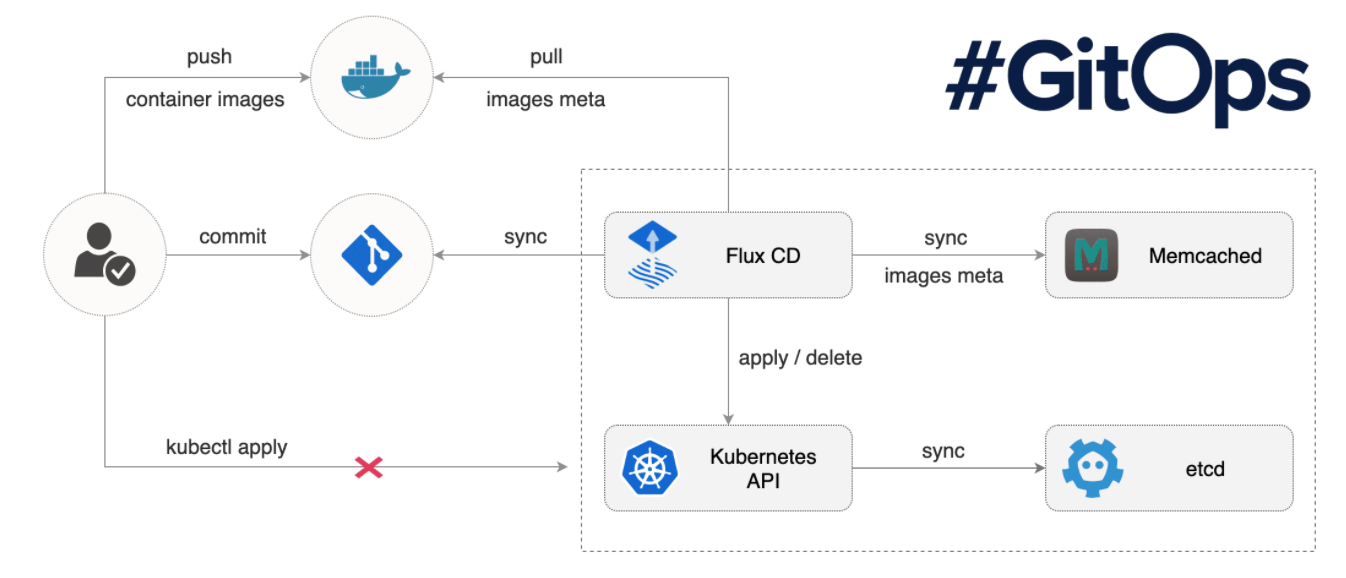
In an ideal world, adding to the blog would be as simple as opening any machine that I can run hugo and access a repository of the sites project files. then I could pull down the files, make the relevant changes, produce the HTML/CSS outputs; before pushing it all back again. Then as if by magic, some process spots the change to the repo, triggering a docker build on some VM instance, before finally yelling at Kubernetes ‘Yo, I’ve got a newer image for you’. What I have just described is known in the enterprise as a CI:CD Pipeline. CI, ‘Continuous Integration’; is an easy method of changing, testing and sharing code (use of code repository and Hugo). CD, ‘Continuous Delivery’; refers to the automation of building an application, as well as it’s deployment into the production environment (said vudu magic that spots the code change and triggers a build, before GKE creates fresh pods with the new container release inside).
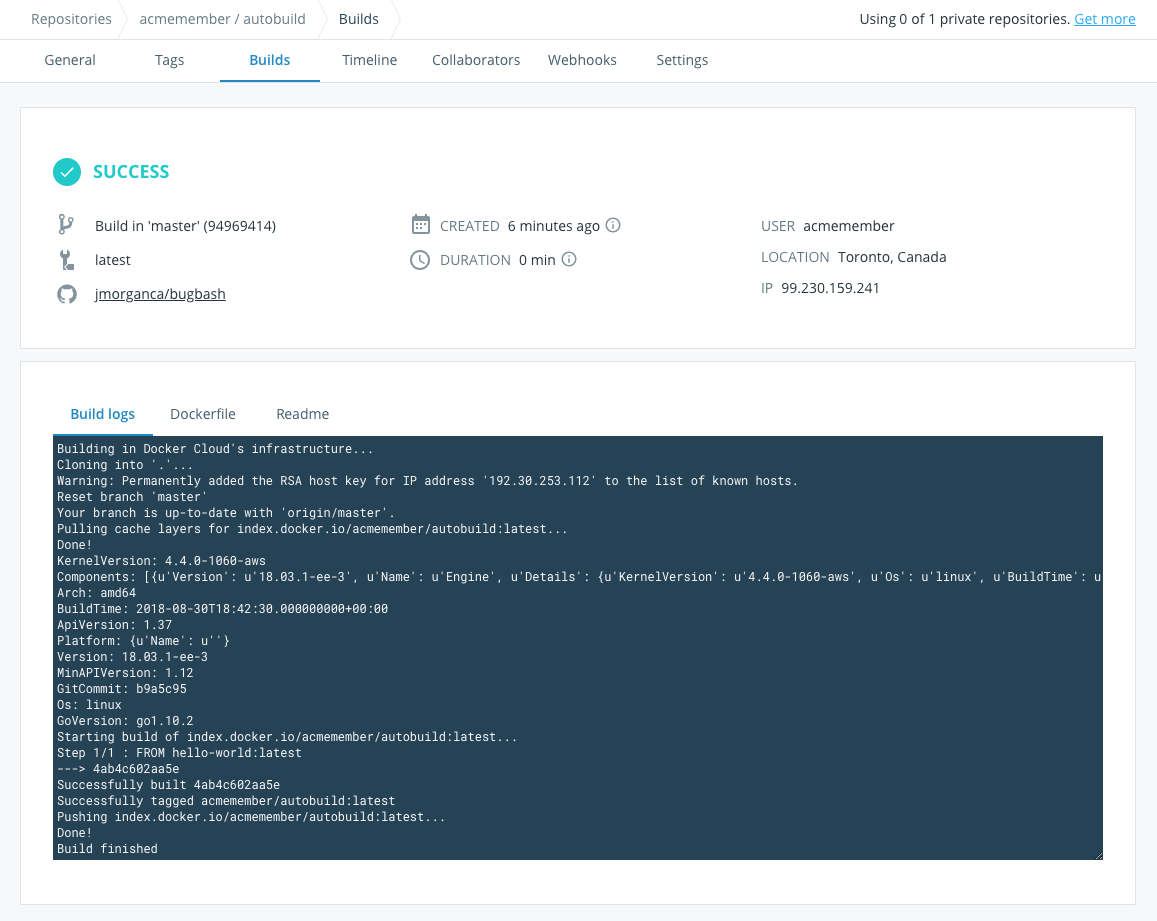
Overview of Docker automated builds functionality on Docker Hub web UI
To achieve this, the obvious first choice for enabling easy integration was Github. It’s free, and I was also comfortable using it. That way I could have a saved snapchat of each update to my site, with easy access to it from just about every electronic device I could think to work on. The CD side is where things got interesting for me, as I needed to figure out how I could easily trigger a docker build from a git commit, saving myself a step. Docker came to the rescue here, with the ‘automated build’ feature within docker hub. Using a webhook, a push to my github repository initiates a new build on a Docker hosted VM, and then places it in a docker hub repository that you can easily reference within your Kubernetes deployment. As for triggering new pods to be created within GKE? This will hopefully come in the near future 🤞. I have been looking at an awesome tool called Flux, that provides this kind of functionality. This is something I will hopefully look into soon, but I realised that maybe creating a ‘dev’ branch to commit to before merging it into the master release would be preferable. This way I won’t accidentally publish half my article midsession 😂.
Back to GKE: Deployments, Ingress and… TLS (Torturously Long Setback 😭)
Before I crack away with an overview of how I went about working on this part of the project; just a short disclaimer. Due to the number of headaches, misconceptions and design changes that led to this most current configuration, I will keep things brief; no braincell’s shall be damaged in the making of this post.
Deployment
From the point of view of deployment, this was a pretty simple step after the months of reading I had done about k8s and kubectl. A deployment YAML config file was created to ensure that if needed, I could redeploy the same configuration elsewhere, and minimal configuration would be required. In fact, I actually deleted and recreated my GKE cluster a couple of times during setup (unfortunately I noobed out a few times), and this saved my bacon. I have added my deployment below, and I have added features to it such as rolling updates and grace periods (super super neat!). After having my pods running safely on GKE I thought ‘great, this is easy!’. Fortunately… the next stage blew my mind a little.
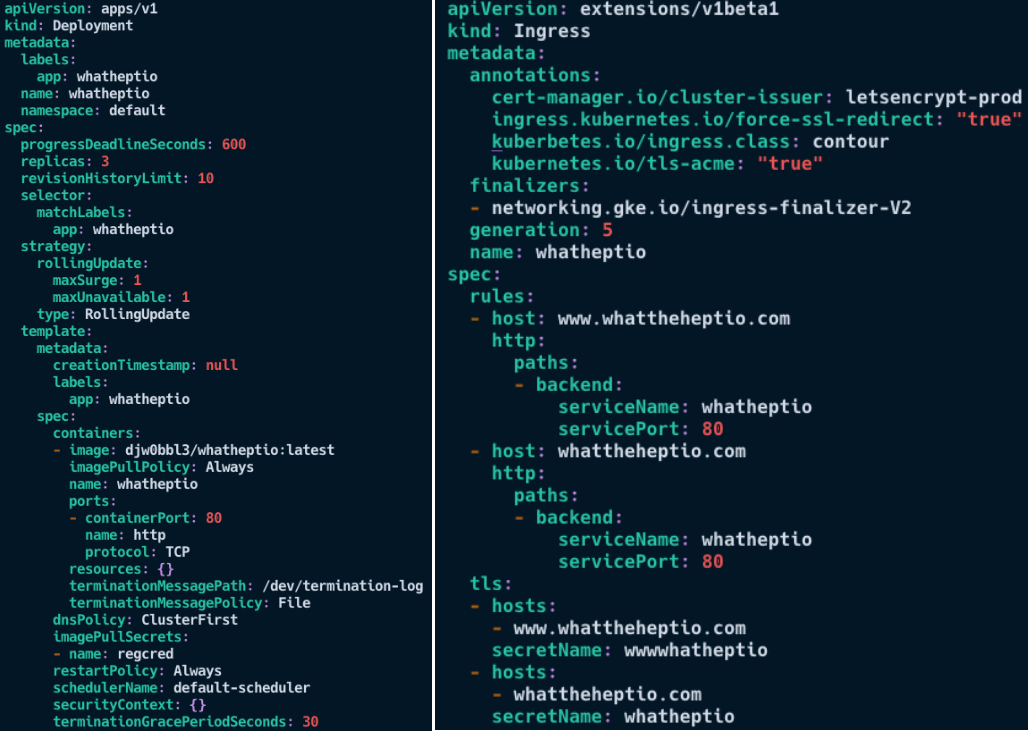
Yaml files used for deployment and Ingress
DNS
Google Cloud DNS provided a reliable method of redirecting the user entering the domain name of the site to the appropriate Ingress IP. Ahh wonderful, Ingress. If you’ve been keeping an eye on the blog, the first post was all about Ingress, so I should be a master at this step. “It’s gonna be a piece of cake”, I thought. No. No it wasn’t.
Ingress
Brief Note: While I am sure that all of those reading this will have heard of HTTP/HTTPS, you may be unsure as to what the actual difference is between them. If so read this 😊
From the perspective of configuring ingress from the domain to the desired endpoint using http (non-encrypted), all went as expected. I followed the documentation provided by Google, and it all went according to plan. The same cannot be said while configuring SSL/TLS. Google cloud provides the capability to automatically have your certificates managed by google… fantastic! Although, as much as I want to tell you that this whole process went smoothly… it really didn’t. Granted, this may be due to my lack of maturity as a Kubernetes admin, but the problem boiled down to the fact that no matter how hard I tried.. I just couldn’t seem to get requests to default or redirect to port 443 (HTTPS). I tried endless tricks, workarounds, guides, forum post answers… but none brought me to the desired result of secure access 😑.

The problem seemed a little to do with limitations in the GKE ingress controller, and maybe I was looking in the wrong place, but documentation was both vague and lacking. Furthermore, let’s just say I was not the only one that had issues in this area. So I figured, scrap it. Let’s deploy an ingress controller that is fully managed inside of my Kubernetes cluster. ‘Aha!’ I thought, ‘let’s use Contour!’. After all I just spent time overviewing it (quick promo for previous post), so it would be fitting that it was to actually be used for the ingress of this site!
Following Dave Cheney’s guide, that provides a step by step walkthrough for deploying Contour; I was up and running within an hour. Compared to the two days of stumbling around aimlessly (reference to Jim Carey above), this efficiency was welcoming. Also included within the guide (and what I was most excited about) is the steps for deploying cert-manager; a k8s addon for automating the management and issuance of TLS certificates… ‘ooh la la’ I thought. And ‘Ooh la la’ I uttered not long later. After deploying Contour and cert-manager, declaring their use through the ingress annotations and pairing the relevant secrets (containing my certificates) was all it took for fully working Ingress with added TLS that was fully enforced by the ingress controller 🍾.
Step 3. Step back and Relax
So that’s it. That is how I went about configuring and deploying the webpage that sits before your very eyes. While this article provides an overview, there were many more headaches, problems, breakdowns and confusions that took place in the process. But overall, I am happy with how it has all turned out. The plan in the coming weeks and months is to flesh it out further, with more articles (of course weekly, I’ve promised myself), and some added functionality (shiny web UI features 😲).
If you have felt anything at all about this article, please provide me with some feedback, and I can take it in my stride moving forward with the project. If you have learned something I would also love to hear as that is what this blog is all about! Finally, if you have any ideas about platforms or tools that I could overview, do not hesitate to forward me a suggestion, and I will do my best to provide something informative yet exciting.