So you want to commandeer your very own kubernetes vessel… but don’t know where to start? Look no further.
Okay, so I agree. Kubernetes is an exciting concept for those interested in the enterprise computing world and unless you’ve been living under a rock for the past year, you have probably heard the name thrown around left, right and centre. In fact, this blog on its own does a pretty good job that. You then begin to delve into the documentation, which talks about the ‘microservice architecture’ way of life and you start to think, “What the Hell? How am I meant to just quickly develop my own microservices for the sake of trying out this platform?”. Well this is how I felt, but unfortunately I didn’t stumble upon a blog post like this that will now show you a fun way that you can try the fundamentals out for yourself.
What ingredients do I need for this exercise?
All that is required is a google account with either some free credit for Google Cloud, or a bank card attached. Not to worry though, the cost over the time required for the exercise should be no more than $5. It would also be handy if you had your own unique domain name, but this isn’t crucial.
 The blog posts are only just the beginning…
Let’s deploy an Online Boutique
Right, let’s begin. The first ingredient that we require on this exciting journey to our publically available shop for the boutique lovers of the world, is a suitably named ‘classy’ cluster.
As mentioned in the introduction, we will be making use of Google Cloud and its infamous ‘Google Kubernetes Engine’. Why Google you ask? Well, there are couple of reasons why I think this is a preferable choice for a beginner user:
- $300 free credit is redeemable from Google to use on their cloud services, so you can kube away to your hearts content for months before paying a penny.
- GKE is the most ‘beginner friendly’ and simple enterprise Kubernetes service out there at the moment. In my eyes, it’s also the most reliable and finished version of the platform.
- We could have used a local kubernetes distributions such as minikube or kind, but these are not designed for production applications and miss out on some key features.
Install GCloud-SDK
Once you have access to the Google Gloud console using your Google Account, the next step will be to create a project in the UI and to install and setup the GCloud-SDK from the terminal on your machine. This will allow us to configure Google Cloud projects from the CLI; a handy tool when provisioning your first cluster. Once the install has completed, you should be able to type gcloud init, to connect to your Google account and select the project you made earlier.
Oh, I almost forgot; you’ll also need kubectl. This is a simple binary that will allow us to interact with the kubernetes clusters that we have access to. This is somewhat of the communication layer that you will use for your cluster, once it has been provisioned. One other tool that may also be useful is kubectx, which will allow you to switch between kubernetes namespaces with the kubens command and the cluster that you want to control, with kubectx. Feel free to give it a try!

Provision that Cluster 🚀
It is now the moment we have all been waiting for. We have a Google project to host our boutique, as well as a cli to interface with it. We are now at the stage where our cluster is ready to be born out of the fires of the Google data centre.
gcloud services enable container.googleapis.com
# enable the Google Kubernetes Engine service
gcloud container clusters create classy-cluster \
    --enable-autoupgrade \
    --enable-autoscaling --min-nodes=3 --max-nodes=10 \
    --num-nodes=5 --zone=us-central1-a
# press the big red button, declaring lift-off!
Above you can see the output you should see in your terminal window upon calling these commands (I can only apologise for the scaling, but it shows you what to expect). As you can see, it finishes with the output of kubeconfig entry generated for classy-cluster. Fantastic news! Your cluster should now be addressable with the kubectl get nodes command, which lists the 5 nodes that we created. We’re off to the races.

Time to get Boujie

Earlier in the post, I referred to an ‘Online Boutique’, that is deployable on Kubernetes with a few simple steps. Well, this is in fact a demo application for Kubernetes, consisting of no less than 10 separate microservices. Once deployed, you can use the app to browse through some imaginary items, before adding them to a cart and purchasing. The best part is that on GKE, it is super easy to deploy, which makes it perfect for learning purposes.
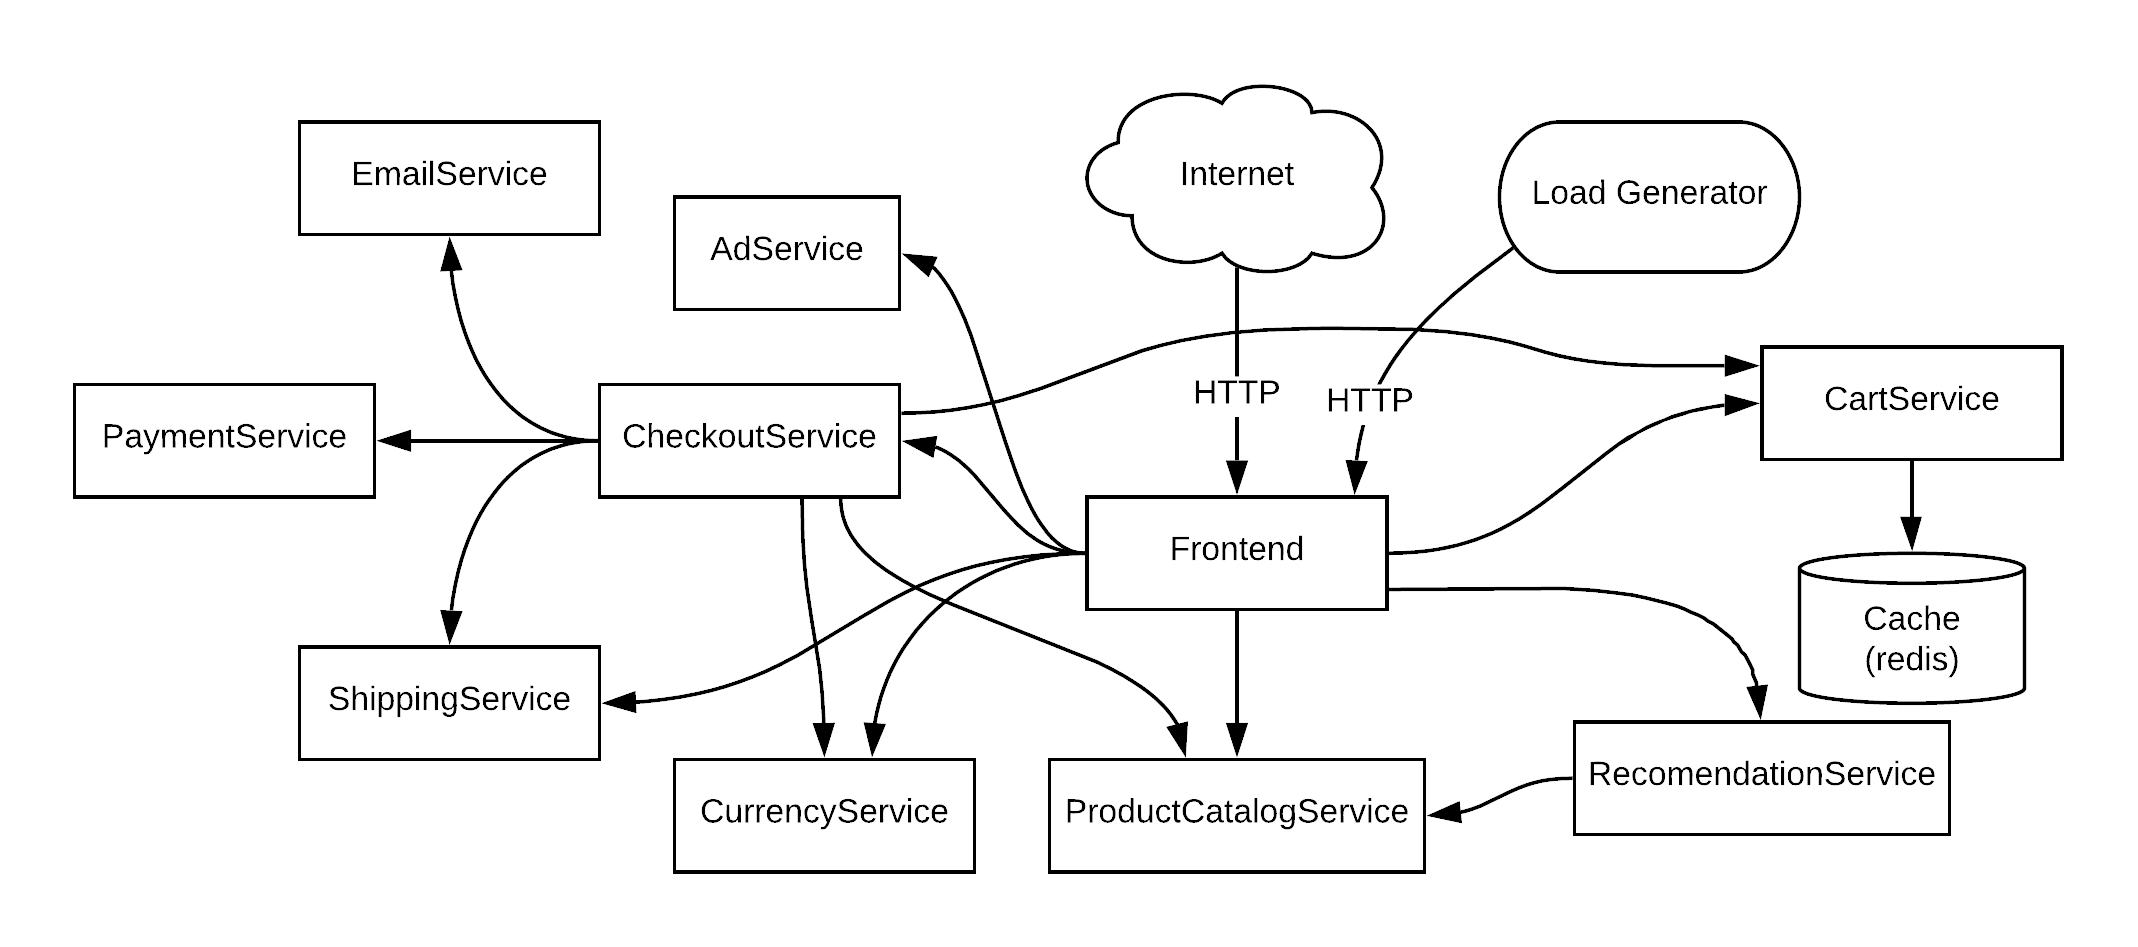
What the boutique looks like under the hood.
In order to deploy this application, we must first perform a git clone of the github repository, so that we can save a copy of the required kubernetes manifests. This file, written in yaml, instructs to the kubernetes api-server which containers to run, where it can find them, as well as a selection of other parameters such as the ports to be used for the services, the resource requests/limits (cpu and memory) and much more. After cloning, navigate to the ‘release’ directory, and open the kubernetes-manifests.yaml file, to take a look at the many kinds of declarations it features. This is the file we will be passing to the cluster with kubectl in a moment, so keep hold of it.
Now that we have our manifests at the ready, we must now create a namespace. These are siphoned off areas of the cluster, intended to organise separate clusters and development teams that are working at the same time. liken them to rooms in a building, or sections in a library. By calling kubectl create namespace boutique, we can create a special little place for our application to sit. If you installed the kubectx application, the kubens command will come in handy here (e.g. kubens boutique). Otherwise, you can type something like kubectl config set-context --current --namespace=boutique, to switch to the boutique namespace using kubectl.
Finally, let’s go ahead and deploy our application on the cluster with the following command:
kubectl apply -f kubernetes-manifests.yaml
# and we're off!
Checking that we’re Golden
you should see a list of terminal outputs, informing you that the resources declared in the manifests are being created in the namespace that kubectl is looking at. The command kubectl get pods should bring up all the pods that have been deployed for our application. After a minute or so of the status showing ContainerCreating, they should be up and running.
Warning: I experienced some issues with the loadgenerator pod, where it would get stuck in a CrashLoopBackOff, meaning that it was repeatedly crashing during intilisation. I resolved this by using kubectl describe loadgenerator-<unique-pod-id>, which gives some more information about the pod, before performing a kubectl delete pod, which will re-instantuate it. This brought the status to the Running state we are looking for.
Lets take a look at our Boutique!
Now that we have all pods up and running, we can call kubectl get services, to take a look at the service objects created thanks to our manifest. In the list of objects that it gives back, you should notice a little service called frontend-external, with its TYPE set to LoadBalancer. It should also have an EXTERNAL-IP assigned to it. If it is set to <pending>, just be patient and use a watch kubectl get service command to wait for an IP to be presented to you. What is happening here is that the Kubernetes api-server is communicating with Googles load balancing service, asking for it to assign a unique IP address to this service endpoint. Pretty cool huh? You should now be able to use the EXTERNAL-IP provided to view your Boutique. Woo-hoo! We did it!

Hey, check out my store at 35.193.255.113 😬
Disclaimer: This section requires that you own a domain name that can be assigned to your cluster.
Yeah, I agree; we’re not really going to just give all our pals this IP address on the back of a napkin. Sure, it works… but it doesn’t sound very ‘boutiquey’ if you ask me. I hear you say, ‘oh, we can just map the IP with an A record to my domain name on the DNS’. Well, you would be correct, but I have a more effective ‘kubernetes way’ to do this part. Introducing the beauty of ‘Ingress’.
This was discussed in the very first blog post I made, so it may be worth going back and taking a look if you’re interested. In esssence though, the ingress controller is a Kubernetes implementation that allows traffic to be directed to specific service endpoints on the cluster, based on parameters such as the domain and extension that has been entered by the user on the client end. This is very useful for handling a tonne of front-end services through one public facing load balancer (LB) IP address.
My ingress controller of choice is Contour, and can simply be deployed using the command below. We will also check that the pods for the deployment are running correctly, as well as list the service of the envoy daemonset, which is the heart of the contour operation.
kubectl apply -f https://projectcontour.io/quickstart/contour.yaml
# deploy contour
kubectl -n projectcontour get pods
# check that the pods are running
kubectl get -n projectcontour service envoy
# list the envoy service, and its LB IP address
When you call the final command, the public IP should be shown for envoy, which is where you want to point your domain name to. Once you have done this, typing host my-k8s-boutique.net with the respective domain should give back the IP of the envoy service. Bare in mind that this may take a little while to update, so don’t get impatient like I often do!
Finally, we can create an ingress manifest, which declares an ingress resource for contour to take note of, giving it the information it needs in order for the traffic of our domain to be forwarded on to the service. A quick kubectl -f boutique-ingress.yaml should get this baby up and running. And as if by magic, we can view our boutique in the web browser through our domain! Now you can flex to your friends with your very own online boutique without repeating the IP to them 34 times. Even though you can’t actually buy anything 🤣.
apiVersion: networking.k8s.io/v1beta1
kind: Ingress
metadata:
  annotations:
    kubernetes.io/ingress.class: contour
  name: frontend-external
  labels:
    app: frontend-external
spec:
  rules:
  - host: my-k8s-boutique.net   # Change this to your domain!
  backend:
    serviceName: frontend-external
    servicePort: 80
Persistence is a Virtue
So if you’re still with me at this point, I applaud your efforts. While this is a fairly straight forward project, it is still a lot of content to take in at once.
While digging around our newly christened boutique store, you might have noticed the shopping basket. Sure, looks great; but what happens if the micro-service pod responsible for this functionality dies during a customer shopping spree. Remember, pods are designed to be ephemeral, meaning they are not expected to live very long. If you fill the basket with items and then carry out the command kubectl delete pods -l app=redis-cart, the boutique should show some error messages while a new ‘redis-cart’ pod is being created, before becoming available again. But you’ll notice, the items you added to the basket are now gone! How inconvenient.
This problem occurs because the pod has not been assigned a ‘persistent-volume’ to store data that will survive the pods lifecycle. This is a resource that maps to a mountpoint on a physical disk such as Persistent Disks that are used by Google Compute Engine (GCE). So how do we do this to ensure maximum boutiqueness? All that’s needed is a short yaml file declaring a request for the storage object, followed by a reference to it in the original kubernetes-manifests.yaml file for the boutique.
The yaml below shows the persistent volume claim manifest. This is a request to a ‘storage class’ provider to give the cluster some storage of a specified size. you can view the storage class providers by typing kubectl get storageclasses.
apiVersion: v1
kind: PersistentVolumeClaim
metadata:
  name: redis-cart
  annotations:
    volume.beta.kubernetes.io/storage-class: standard
spec:
  accessModes:
    - ReadWriteOnce
  resources:
    requests:
      storage: 10Gi
As you can see above, I have requested a persistent volume called ‘redis-cart’, using the storage class ‘standard’, which is the storage class installed by default in GKE for using Persistent Disks in GCE. The ‘ReadWriteOnce’ declaration just means that it can only be mounted as read-write by a single node. This is the default mode and will work for this scenario. I have requested 10gb of storage, which is also plenty for this example. As usual, the kubectl apply -f redis-cart-pvc.yaml command is enough to get it attached to the cluster. We can check that the volume was created by checking for the BOUND status upon calling kubectl get pvc.
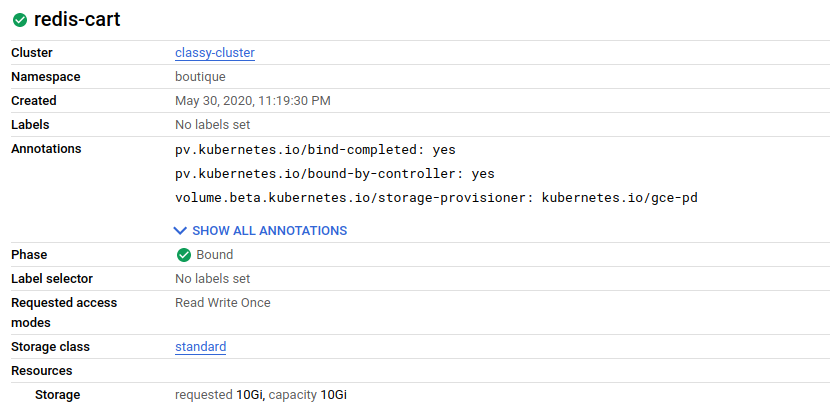
The persistent volume, as seen in the Google Cloud console
Now to let the redis-cart deployment make use of this prime real-estate, we need to edit our original kubernetes-manifests.yaml. There are many objects in this file that we don’t need to touch, but the section in question can be seen below, with the appropriate edits already in place. You will notice that at the bottom under volumes:, my yaml states a persistentVolumeClaim, as opposed to the original EmptyDir. This is where we need to set it to the name of our PV redis-cart, before saving the yaml file.
### Changes made to Redis Cart so cart data is saved to PV ###
apiVersion: apps/v1
kind: Deployment
metadata:
  name: redis-cart
spec:
  selector:
    matchLabels:
      app: redis-cart
  template:
    metadata:
      labels:
        app: redis-cart
    spec:
      containers:
      - name: redis
        image: redis:alpine
        ports:
        - containerPort: 6379
        readinessProbe:
          periodSeconds: 5
          tcpSocket:
            port: 6379
        livenessProbe:
          periodSeconds: 5
          tcpSocket:
            port: 6379
        volumeMounts:
        - mountPath: /data
          name: redis-data
        resources:
          limits:
            memory: 256Mi
            cpu: 125m
          requests:
            cpu: 70m
            memory: 0Mi
      volumes:                  # Where we want to edit!
      - name: redis-data
        persistentVolumeClaim:
          claimName: redis-cart
Now finally we are ready to go ahead and call our final kubectl apply -f kubernetes-manifests.yaml to do what seemed unthinkable only minutes ago. You have now attached persistent storage to your redis cart! A quick call of kubectl get pods will show the pod in a running state. You can then add items to the basket and try deleting the pod. Once it comes back up, your redis database is back up off the canvas 🥊.
Finishing Up (Don’t forget to delete your cluster!)
All I can say after that one hell of a slog is congratulations for completing your first ever boutique quality Kubernetes project! We have taken a look into what is required to front up a public-cloud based cluster, as well as the initial steps that are taken to deploy an application using kubectl, before making it publically available.
Now that we have come to the end of this post, you might want to delete the cluster to ensure you save your pennies for the next exciting run in with Google Cloud. If you want to take things a step further, I would suggest that you maybe look into securing your application with HTTPS traffic. For this you will need a TLS certificate, which can be achieved with ease, thanks to the cert-manager certificate management controller. Past that, you could maybe even take a look at creating a Grafana dashboard that monitors users navigating the site using Prometheus to scrap metrics. Who knows, the world is your oyster!
So, without further ado, let me sign off for this latest post, wishing you all the best wherever you are. Oh yes, without forgetting the command to kill the cluster. Cheerio!
gcloud container clusters delete classy-cluster 👋👋👋